Pages

Showing posts with label D.I.Y. PROJECTS. Show all posts

Tuesday, August 23, 2011

DIY Post: More Denim Goodness

After this post, I'm gonna shut up about denim for awhile. Promise. :) Here's a few denim pieces I've remade and DIY'd. All of these will be posted and sold (if I can let them go) at my Facebook shop along with several other pieces.


Remade Esprit Denim Jacket w/ Tribal Accents


Cropped Denim Top with Leopard Heart


Bleached Denim w/ Studs

Sunday, August 7, 2011

DIY Post: Random Projects

Here are several DIYs I've done before that I never got a chance to post. Hope you'll find some inspiration in these. :)


This will be available on my FB online shop in the next few weeks.


Made this because I missed summer so much. Will probably sell similar tops in the shop soon.


I only (half) finished one pair so far. lol. Will finalize and add more details to this and the other pair in the next few days. 

Thursday, July 14, 2011

DIY Post: Smiley Shorts

Here's the DIY for the smiley shorts. This one's pretty rough since I didn't bother taking actual step by step pictures but i'll outline the steps I took here.


Materials:
- Shorts (white) *you can try and find yellow shorts or you can dye the shorts yellow
- Fabric Dye    
- Scissors
- Black Fabric/Acrylic Paint
- Brush
(Markers can also be substituted for the paint & brush. You can use a Sharpie laundry marker.)


Step 1: Take your white shorts and dye it. Just follow the instructions on the dye packet. I used white denim shorts since I love working with denim rather than regular cotton shorts.


Step 2: I actually didn't dye my shorts because I was too lazy to look for fabric dye and I really (really) wanted to finish the project right away. Hence, I handpainted mine. I used regular fabric paint. It's just a bit more tedious than simply soaking it in dye. I would suggest dyeing it though so you get a more even coverage. Mine ended up slightly splotchy.

After that, you can start mapping where you want to place the smiley and what kind you like. Just Google smiley faces if you need reference.  I placed a smiley on the right side and also cut off the hem since they were too long for me.


Step 3: You simply darken your outline using a brush or a marker if you're not comfortable using a brush. It should look like this in the end. You can then add embellishments, distress, fray the edges etc.


For the back portion, I took out one of the pockets first before I painted the Nirvana-esque smiley so I get a good, even surface. 


Then you should be done! Hope this helps and thanks for the wonderful comments on the previous post. I know I say it all the time but I really do appreciate it. :)  Cheers!

Tuesday, July 12, 2011

Can't Beat A Smiley Face

In an attempt to live up to my promise in wearing more color, I decided that I needed canary yellow shorts in my closet. (conclusions like that often happen in a heartbeat) Couldn't find one anywhere so did the next best thing, diy!

Got inspired by similar smiley shorts I saw at Bitching & Junkfood before. I know that the colors seem a little "too summer" (we're in monsoon season in PI) so I paired it with knee socks. It rains in the afternoon anyway so I think the look worked out fine.


These cut-out sleeve tops are everywhere but I didn't really wanna spend money buying one (plus I couldn't find one locally) so I just tweaked my favorite vintage polo. Fell in love with the color when I first saw it. It's a gorgeous, shiny eggplant shade. 


My little 90s grunge tribute. 

I still want to distress the shorts a bit more but I really just wanted to wear it asap. It's time consuming to distress denim. Will get around to that later on, I guess. Hope you're having a great week so far. Cheers!


Don't you just love that smiley face? :)


Eggplant Top - Vintage (diy cut-out)
Smiley shorts - diy 
Floral Tapestry Bag - Vintage - Liz Claiborne
Lace knee socks - Modernosense
Laceup wedge - Thrifted 


Tuesday, July 5, 2011

DIY Post: My 3-Step Tank Top

Trying to catch up with my blogging. Everything's so crazy that it seems I'm going about my day half holding my breath. Anyway, enough of the chit chat. Let me share a simple DIY project I worked on recently.

As you know, I've been loving nude colored anything for a while so I couldn't resist it when I found a lovely, nude colored fabric when I hit the mall one time. Even though it's no longer summer here, I still decided on creating a tank top since it's super easy and works great for mixing with other pieces of clothing.

Materials Needed:
- Fabric
- Old tank top (for reference)
- Scissors
- Sewing machine or needle and thread or fabric glue :)

Step One: Take your fabric and reference tank top; pile them on top of each other then carefully cut out the general shape of the top you want. You should have something like the picture below once you're done. I kept the general shape simple here so it's easier to follow. 


Step Two: Break out your sewing machine, fabric glue or maybe hand sew everything that's marked with a straight line except the sleeves (you want to just hem the sleeve parts :). Don't forget to turn your fabric inside out before you start doing this. 

For the neckline, you can either add collars, hem it or leave it as it is if the fabric you used is strong enough to hold a raw hem. 


Step Three: Then you have a finished tank top! I cut off the bottom portion to create the scallop hem since the fabric I used had a nice scallop design. If you can't find fabric that has this design already then a scallop lace trim will also do the trick. 

I also left the collar un-hemmed because, A) I thought about adding a lace collar and B.) I ran out of lace for the collar because I got sidetracked with another project. : P 


Here's the other DIY project that "distracted" me and used up all my lace. 


 Hope you liked this one. Oh, and thanks so much to everyone who visits the blog and to my new followers! Cheers!

Thursday, June 16, 2011

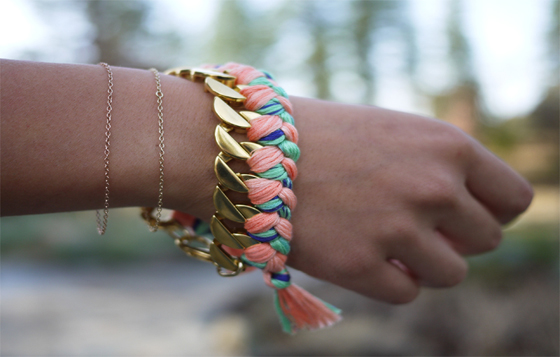
DIY Post: Woven Chain Bracelet (from Honestly WTF)

This a quick DIY on how you can create these gorgeous, summer perfect friendship bracelets. I found this DIY from Honestly WTF (awesome site!) and I knew I just had to try it. I'm sharing it with you guys because it's super easy and most of you might love to give this a try.

I won't be posting the step-by-step here. Instead I would encourage you to jump to their site because I think they explain everything way better. :) The tutorial link is at the bottom. Anyway, here are the ones I made.


I used a smaller chain for this one. 


For this, I thought why not turn it into a necklace instead of just a bracelet? So I attached one of the chains from my necklaces and voila! instant tribal looking necklace. You can attach feathers or other charms as well. 

If you're wondering about the color choice, well, truth be told, I wanted to use different colors for this but silly me forgot that I didn't have the colors I wanted on hand.  When I opened my thread box I only found these colors (including the red and pale pink for the bracelet.) Didn't want to spend anymore or wait any longer to make these so I just gave it a go. The fun part about this DIY is that you can always go back and change the colors later on. I know I will. :) Lemme know how yours turned out. Cheers!

Photo from Honestly WTF

CLICK HERE FOR TUTORIAL

Thursday, June 2, 2011

DIY Post: Reconstructed Denim Dress

Yay! Finally a post! It's been a hectic week. A few good things happened and a few bad things happened, but it's all good. Anyway, I can't post the DIY shorts yet since I'm still working on it, so I'm putting up a DIY for the denim dress that I reconstructed. Actually worked on this way back, but I wasn't able to finish it until recently. Here's what you need:

Materials:

1. Any old/long denim dress
2. Fabric glue or sewing machine
3. Scissors

After being obsessed with Kate Bosworth's denim dress and not being able to find an equivalent where I'm at, I decided to just make my own mini denim dress. I started with this long denim dress I found at ebay for about $1.50.

Picture taken from eBay seller. 


Measure the length you want the dress to be in. You can tell that I already cut it up in the picture. Had to cut an extra 2-3 inches more because I found it too long still.

This is what I ended up with. After that, you want to cut out the sleeves. Cut from the part where the seams go so you have a cleaner edge. 

You can sort of see how it will look like as a mini dress. All that's left is to tidy up the seams. But before I did that, I decided to add a cute little heart design at the back. To do that, you need to mark off your center. Freehand a heart like I did or maybe use a stencil. 

Marked this off using those fabric highlighters.


Cut out the heart shape. Don't worry about not being too perfect with it as long as you get the general shape, it's fine.


Then take some extra denim, flip it and glue it to the inside of the dress; lighter side facing up to add some contrast. Afterwards, I frayed the edges of the heart shape.


For the seams, you want to iron it first to make it easier to sew or glue.


You can use fabric glue or a sewing machine - which I don't have yet :( - to clean up the edges. A word about the glue, this one is called Amazing Goop. Fabric glue is so tough to come by where I'm at. Had to order this one online and wait. (Yes, at times I feel like I'm living under a rock.) 

It's my first time to use this so I'm still waiting to see how it will hold up after repeated washings etc. When using this same brand, work in a ventilated area. 


The glue is so thick that it was hard to spread out. It's better to just make little dollops instead.


Then you have to slowly knead it into the fabric. You have to sew or glue all the seams: the bottom ones and the sleeves. Wait for the glue to dry for 24 hours, make sure to place it in a ventilated area. The smell from the glue is just too strong.

Here's the dress when it was finally done.


I'm still probably gonna tweak this a bit more. I originally wanted to bleach it so it wouldn't be so blue so I still might do that.

Here's the back portion. Just ignore my tattoo. :) Let me know what you think. If you have any questions, feel free to shoot me an email or comment. Cheers! 


Sunday, May 22, 2011

DIY Post: Handpainted Leopard Bag

Finally back online! Had to suffer through 12 hours of no electricity today. Insane! The power company was fixing something. Would have headed out to the mall but I found out too late that it was gonna go on for 12 (freakishly-long) hours. Kept thinking (hoping) that it would come back earlier but it didn't. Anyway, nuff of that. Just stressing because I just missed an entire day's workload. But before work, here's a quick post.

Here's a photo post of how I handpainted my leopard bag. This isn't really a tutorial but I guess, you can grab some ideas on how you can create or design one for yourself.

Materials:
1. Angelus Leather Acrylic Paints - normally use these for painting shoes but figured they would work just fine
2. Bag (thrifted, old bag etc.) 
3. Medium sized round brush 


Here's the bag I started with. This one was thrifted for a dollar. It's made up of canvas along with leather accents. Found it in great shape except that it was rather dirty in places. Honestly thought that I could take out the stains with a strong bleach but they didn't come off. So, I changed tactics and tried dyeing/staining it with coffee and tea. I was actually just experimenting. Figured that it works on paper, thought that it might work on canvass too! Unfortunately, it didn't on my bag. Submerged it for more than a couple of hours  but all I ended up with was an even more uneven looking bag.

So, changed tactics yet again and decided to just mask the stains and blotchy color with paint. I started painting random leopard marks on the sides. Why leopard? Because it's easy. :) And if you're as impulsive and impatient as I am, "easy" is your best friend.  


There's no need to be perfect with the marks.


Then I started coloring them in. I used brown and mixed it with copper for the final coat. You can pretty much use any other color you want. The paint I used isn't as opaque as I wanted so it was hard to pick a much lighter/brighter color.    


This is what the bag looked like the other day. I thought it was okay but ultimately decided that it didn't look much like a leopard print so I tinkered with it again today. And thanks to the 12 hours of no internet for me, I had time to work on this. 

Here's the glamor shot. I actually like how this turned out. I didn't fuss in making the spots totally perfect since I wanted the handpainted look to show through. What do you think? Lemme know what DIY projects you've been working on lately, would love to hear about it. Cheers!


P.S. Just realized that you can easily use Sharpies to do this if your bag is made up of canvas.

Friday, May 6, 2011

It's a Paper High

Been busy trying to come up with new packaging for the foxtails that I'm selling at my shop. I'm worried about shipping them since it might damage the shape etc. They got to me just fine so don't really know why I'm so worried about stuffing them in a pouch and letting the delivery guy handle everything. :)

Also noticed that ever since I got them, I have a tendency to stroke the fur each time I see it. I have them hanging in my room so every time I go in to get something. I find myself stopping and stroking the fur once or twice. lol I also do that whenever I see dogs or other pets too. Of course, most of the time, I consciously have to tell myself, "no," or quietly whisper "you wanna lose your hand to a rabid dog??" Anyway, I digress. 

Back to packaging. Since I couldn't find the right size and shape of the box I wanted, I decided to make one. Found these lovely, lovely papers at a mall I hardly visit. It was a sign of sorts, I'm sure, since I've been thinking about looking for printed paper as packaging material. Never found them in the other malls/bookshops I frequent. These were the only colors available but the prints were nice.

My favorite is the bamboo print.
 Here are the boxes I made. It's my first time to do this so was pretty much figuring everything as I go. Thought I might as well learn how to make one, in case (??). Not really sure when I would need "boxing" skills but hey, it might come in handy. Used chip board, transparency film, acrylic paint and the paper.


Beautiful prints.

Here's the inside. 
I included a freebie. Bought several turbans that I used here. Thought it might be a nice way to say thank you to my clients.


Here's the finished product. Topped with a red ribbon. This red one was the first box I made and I realized how tough it was to cover the entire front portion in the same paper. Hence, decided to paint the top and leave the paper for the sides. I'm curious, how do you package your items in your blog shop, if you have one? =)